
This is yet another random side project I was working on recently, and my first attempt to reverse engineer a real world application compiled into binary. In this article, I want to talk about how I reversed engineered an Unity IL2CPP binary compiled to NSO, in a step-by-step fashion.
Forewords
Kotoba no Puzzle: Mojipittan is a word puzzle game series in Japanese, where the player makes words from letter pieces on a board. It sort of like Scrabble, but not exactly the same. I always wanted to give it a try, but it was quite an old game, available only on GBA, PSP, DS, and Wii. That’s until they made an Encore version on Nintendo Switch. This game is also one of the reasons I bought a Switch.
Ever since I bought the game, I was wondering if there is a way to solve the game optimally. The first step to approach this is to first get the dictionary of the game. Despite the game has now released to multiple different platforms, there has no resource online on the word list used in the game. I thus decided to do it myself.
Preparation
To follow this article, you would need an exploitable Nintendo Switch with a purchased copy of Mojipittan Encore and a PC running Windows. Although there are other ways to do it with only a PC, I do not recommended shem for reasons. You might be able to also use other OSes, but a lot of the resources has precompiled binary for Windows, which involves less effort.
To get the game data from the device, you need to dump it from the console. Yuzu has provided a detailed guide on how to dump games and corresponding keys. I will use an XCI dump here as an example.
Extract contents
To extract the dumped XCI file, I used hactool, specifically this wrapped version Unpackv2. Once the tool is downloaded and unzipped, follow the next steps:
- Copy the
prod.keysextracted form your device to the folder whereUnpack.cmdis found, and rename it tokeys.txt. - Drop the dumped XCI file onto
Unpack.cmdto start the script. - When prompted…
If your patch was inside XCI, press "1" and ENTER
If you don't have a patch, just only press ENTER
…press Enter. This game exported did not come with a patch. - Now, in the Unpackv2 folder, there will be a new ExtractedXCI folder created with 4 NCA files of various sizes created.
When prompted…Drop here correct NCA patch file (probably the biggest one) from ExtractedXCI folder in
…, drop the 774MB a0547397496b93fcb08f438bcaad2731.nca to the terminal window. - Now the terminal print a list of files extracted, ending with the prompt…
Press ENTER to delete all temporary files
Press Enter twice to finish the export.
After finishing the export process, there will be a new folder created with the extracted content, with two subfolders: exefs and romfs. We will make use of these contents in the next step.
Unpack resource files
When you open the romfs/Data folder, you will be welcomed with some familiar file names, like resource.assets, sharedassets0.assets, level0, and level1. Yes, if you have ever made or opened the directory of a Unity game, you will surely recognize these file names. Unity organizes their asset files in a pretty recognizable pattern, and is well studied by the community with multiple tools created.
At this point, you are free to extract all static assets files found in the game, like text files and textures. The tool I used is Unity Asset Bundle Extractor (UABE). To extract assets, open the .assets files with the tool, and export the assets using the built-in plugins to easily processable formats.
Besides the folder mentioned above, there is a subfolder StreamingData/Switch/datas, which contains assets that are loaded after the game has initialized. Here, the files we are interested are the dictionary files under romfs/Data/StreamingData/Switch/datas/dictionary. Open it with UABE, we can see three text assets: worddata.aid, worddata.cot, and worddata.dic. Extract them with the txt export plugin, we can get three binary files with some sort of patterns.
$ xxd worddata.aid | head -n 2000000000: 5744 5000 0002 1ca1 0000 0001 0001 c1e6 WDP.............00000010: 0000 0002 0001 ffee 0001 5eb2 0001 5eb3 ..........^...^.00000020: 0000 0003 0001 ffef 0001 fff0 0000 0004 ................00000030: 0000 0005 0000 0006 0001 5d48 0000 0007 ..........]H....00000040: 0000 0008 0000 0009 0000 000a 0000 000b ................00000050: 0001 92b4 0001 92b7 0001 92b3 0001 92b6 ................00000060: 0001 92b5 0000 000c 0001 5a5f 0001 fff1 ..........Z_....00000070: 0000 000d 0000 000e 0000 000f 0000 0010 ................00000080: 0000 0011 0001 9019 0000 0012 0001 fff2 ................00000090: 0000 0013 0001 fff3 0000 0014 0000 0015 ................000000a0: 0000 0016 0000 0017 0000 0018 0000 0019 ................000000b0: 0000 001a 0000 001b 0000 001c 0000 001d ................000000c0: 0000 001e 0000 001f 0000 0020 0000 0021 ........... ...!000000d0: 0000 0022 0000 0023 0000 0024 0000 0025 ..."...#...$...%000000e0: 0000 0026 0000 0027 0001 fff4 0000 0028 ...&...'.......(000000f0: 0000 0029 0000 002a 0000 002b 0000 002c ...)...*...+...,00000100: 0000 002d 0000 002e 0002 1191 0002 1838 ...-...........800000110: 0001 5f43 0000 0030 0001 fff6 0000 0031 .._C...0.......100000120: 0000 0032 0000 0033 0000 0034 0000 0035 ...2...3...4...500000130: 0001 6782 0000 0036 0001 6783 0001 6785 ..g....6..g...g.The files start with a WDP\0 header (which was not found elsewhere on the internet), and a bunch of 0000 bytes spread across the odd columns, but we can’t really interpret the meaning of these data by just staring the files. We definitely need the help of the code logic of the game.
Preparing for decompilation
As it is commonly known, most logic of Unity games are written in C♯. When compiled to DLL files, C♯ code is rather easy to decompile. However, in environments where .NET runtime is hard to prepare, or where performance is critical, Unity offers an option called Intermediate Language to C++ (IL2CPP) that further compiles Microsoft Intermediate Language (MSIL) into C++ and further into native code. This technique is commonly seen on Unity games running on mobile platforms. Nintendo Switch is of no exception.
Nintendo Switch runs on a special binary format called NSO, which is a custom variant of AArch64 ELF binary. To save space, a lot of NSO files are by default compressed. We need to first decompress it with hactool.
$ hactool --uncompressed=exefs/main_unc exefs/mainWith the uncompressed binary, we can then use IL2CPPdumper to extract the offset and signature of each function in the binary.
$ Il2CppDumper exefs/main romfs/Data/Managed/Metadata/global-metadata.dat il2cppdumpIn the new il2cppdump folder, you can find the JSON file script.json and a C++ header file il2cpp.h with all the metadata, which we will use later to locate the function code during the actual decompilation.
Browsing the script.json file, we can find some interesting methods that might help us to decode the dictionary file:
void CDictionary__GetDictionaryData (CDictionary_o* __this, System_String_o** strReading, System_String_o** strNotation, System_String_o** strMeaning, int32_t nWordId, const MethodInfo* method);int32_t CDictionary___ConvertKey2String (CDictionary_o* __this, System_String_o** strOut, System_UInt32_array* apKey, uint32_t nLongFlag, const MethodInfo* method);
Fortunately, not only the class and method names, even the parameter names are kept, which will help us a lot figuring out the code logic.
To actually decompile the file, we will use Ghidra, an open-source reverse engineering tool that works on multiple platforms. However, Ghidra does not support NSO and IL2CPP binary out of the box, so we need some install something more to help us, namely:
- Ghidra Switch Loader, which can be installed by going to File -> Install Extensions… in Ghidra and click the + button at the corner.
- ghidra.py from IL2CPPdumper, which can be installed by copying the file to the %USERPROFILE%/ghidra_scripts folder.
Decompile the binary
Finally, we can proceed to decompile the binary. To make full use of the metadata we extracted earlier, there are a few steps we need do before starting to read the source code.
When the main_unc bianry is first loaded into a Ghidra project, it will prompt you to start an automatic analysis. Since the binary contains about 47MB worth of data, it might take a considerable amount of time to conduct the analysis, and we are only interested in a small portion of the code. I thus chose to skip the analysis.
The first step is to import the data types defined in the header file into Ghidra. Since the generated il2cpp.h contains some data types that it does not recognize natively, we need to prepend these lines to it.
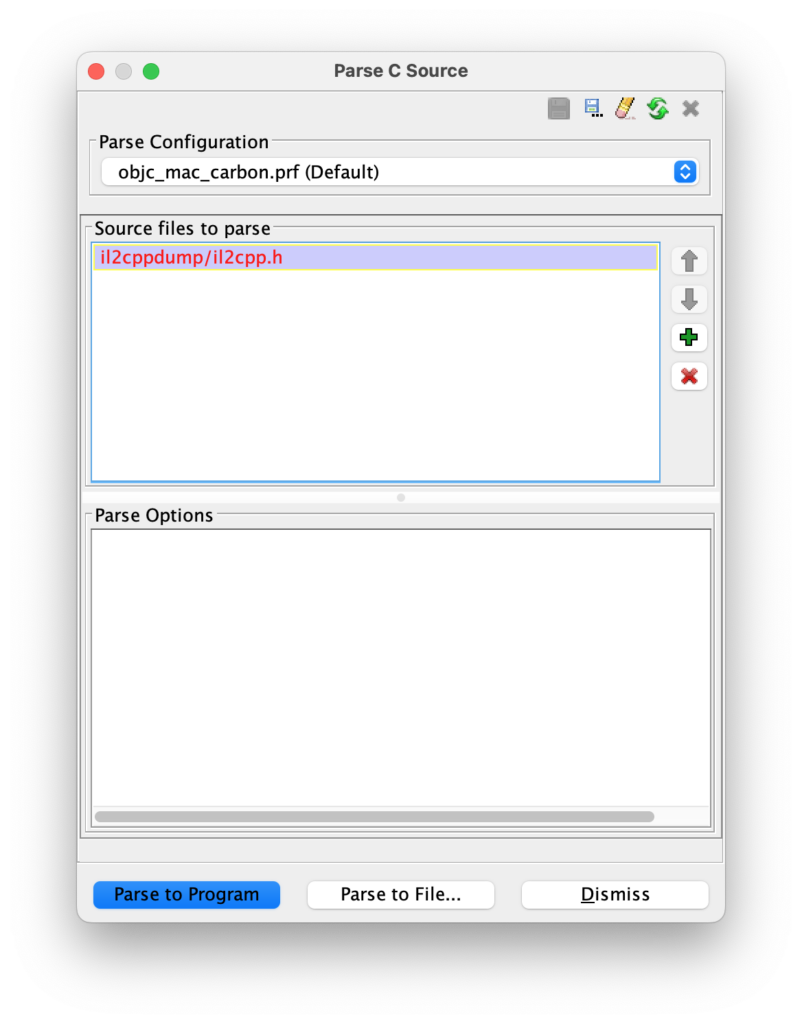
typedef unsigned __int8 uint8_t;typedef unsigned __int16 uint16_t;typedef unsigned __int32 uint32_t;typedef unsigned __int64 uint64_t;typedef __int8 int8_t;typedef __int16 int16_t;typedef __int32 int32_t;typedef __int64 int64_t;typedef __int64 size_t;typedef size_t intptr_t;typedef size_t uintptr_t;With the modified header file, we can then return to Ghidra, open File -> Parse C Source… to import it. When the Parse C Source dialog is opened, clear everything in the Source files to parse and Parse options section, then add the header file we prepared. Finally, click Parse to Program to start.
Next, we need to label the functions at their respective offsets. Open the Script Manager from Windows -> Script Manager, search for ghidra.py, then click the green play ⃝▶ button to run the script. When prompted for files, select the script.json file exported from IL2CPPdumper.
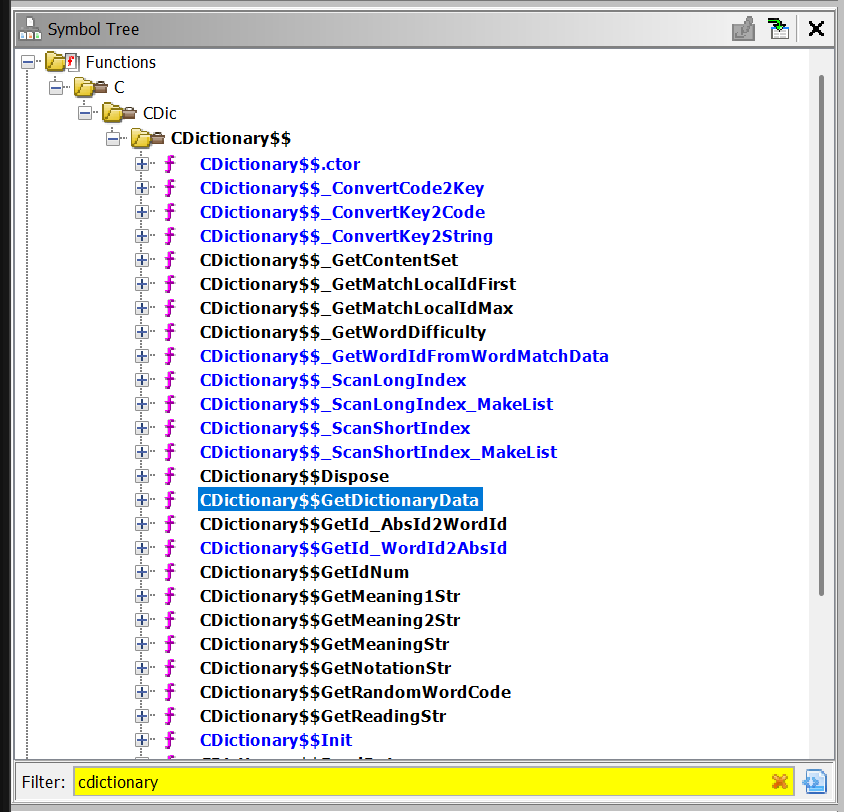
Once the script is finished, we will see there will be all the functions imported in the Symbol Tree panel in the sidebar. In the Filter box of at the bottom of the section, we can enter CDictionary to find all the dictionary related method.
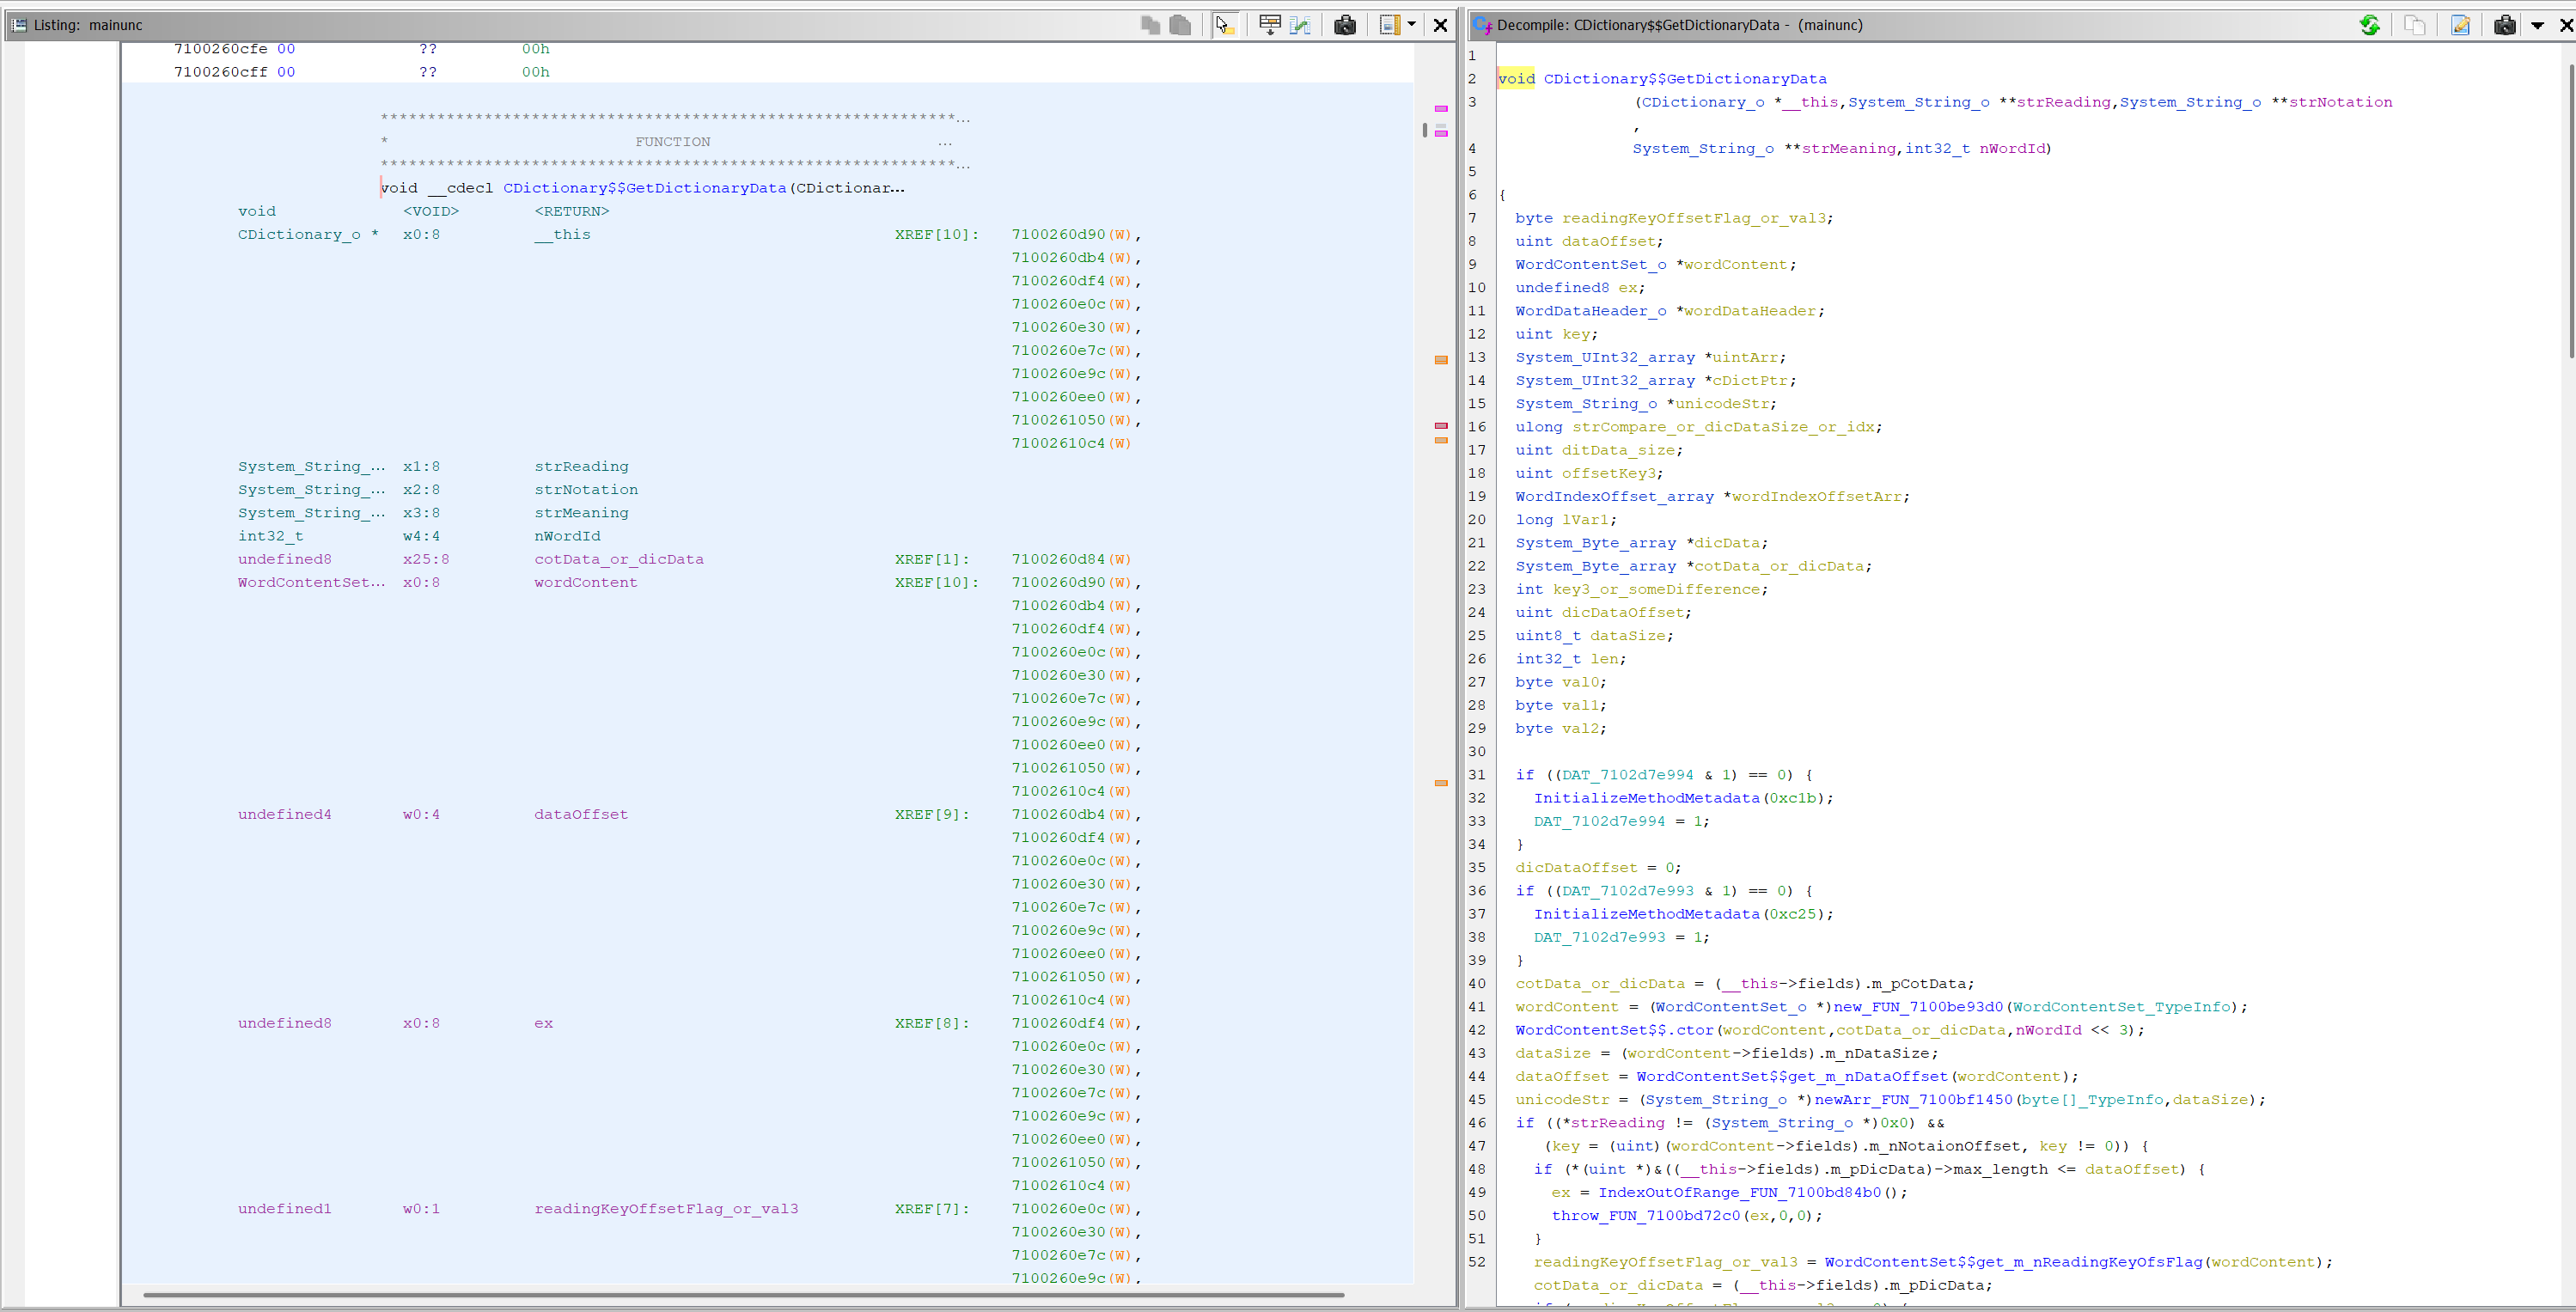
Then we can select the CDictionary$$GetDictionaryData in the Symbol Tree, and Ghidra will direct us to the correct byte offset in the Listing window. If you see a bunch of ?? in the listing, press D on the keyboard to disassemble the function. As it disassembles, some C-like source code will also show up on the right side in the Decompile window.
Inside the window, you may see a lot of types are set as long, unknown8, and strange type that might not make sense. A lot of these can be fixed by correcting the function signature and let Ghidra to re-infer the types. To do so, right click the function name and click Edit Function Signature. In the dialog opened, replace the arguments and return type in the large text box with what you can find in the corresponding "signature" field in the script.json file. Take note that you need to drop the MethodInfo * method argument (which is always the last argument), as it is not decompiled by Ghidra.
To help improving the readability of the decompiled source, here are some helpful shortcut keys:
- ; to add comments
- L to rename variable
- Ctrl + L to reassign type of a variable
- Mouse middle click to highlight all reference of the variable
With correct types, Ghidra is able to better infer some pointer offsets as struct properties or array indexes, which makes. the decompiled source easier to read.
Debugging with emulator
With all the source disassembled and decompiled, it is sufficient to conduct a static analysis and recover most of the logic to parse the dictionary. However, there are still some portion of the code where the decompiled code does not make sense potentially due to some misassigned types.
int CDictionary$$_ConvertKey2String (CDictionary_o *__this,System_String_o **strOut,System_UInt32_array *apKey, uint32_t nLongFlag)
{ undefined8 ex; CMojiBlock_o *mojiBlock; System_String_o *result; int i; ulong apKey10; ulong uVar1; long lVar2; float *matrix03; uint apKey0; uint apKeySize;
if ((DAT_7102d7e960 & 1) == 0) { __this = (CDictionary_o *)InitializeMethodMetadata(0xc24); DAT_7102d7e960 = 1; apKeySize = *(uint *)&apKey->max_length; } else { apKeySize = *(uint *)&apKey->max_length; } if (apKeySize == 0) { ex = IndexOutOfRange_FUN_7100bd84b0(__this); __this = (CDictionary_o *)throw_FUN_7100bd72c0(ex,0,0); apKeySize = *(uint *)&apKey->max_length; apKey0 = apKey->m_Items[0]; } else { apKey0 = apKey->m_Items[0]; } if (apKeySize < 2) { ex = IndexOutOfRange_FUN_7100bd84b0(__this); throw_FUN_7100bd72c0(ex,0,0); } result = EmptyString; apKey10 = (ulong)apKey0 & 0x7fffffff; if (nLongFlag != 0) { apKey10 = CONCAT44(apKey->m_Items[1],apKey0); } i = 0; uVar1 = (ulong)((uint)apKey10 & 0x7f); *strOut = EmptyString; if ((apKey10 & 0x7f) != 0) { do { if (((*(byte *)(SingletonMonoBehaviour<GlobalFunc>_TypeInfo + 0x127) >> 1 & 1) != 0) && (*(int *)(SingletonMonoBehaviour<GlobalFunc>_TypeInfo + 0xd8) == 0) ) { ExclusiveMonitor_FUN_7100bb3c20(); } mojiBlock = (CMojiBlock_o *) SingletonMonoBehaviour<_CMojiBlock>$$get_Instance (Method$SingletonMonoBehaviour<GlobalFunc>.get_Instance() ); matrix03 = *(float **)&(mojiBlock->fields).m_MojiMtx.fields.m03; lVar2 = (long)(int)uVar1 + -1; if ((uint)matrix03[6] <= (uint)(float)lVar2) { ex = IndexOutOfRange_FUN_7100bd84b0(); throw_FUN_7100bd72c0(ex,0,0); }
result = System.String$$Concat(result,*(System_String_o **)(matrix03 + lVar2 * 2 + 8) ); uVar1 = apKey10 >> 7 & 0x7f; apKey10 = apKey10 >> 7; i = i + 1; *strOut = result; } while ((int)uVar1 != 0); } return i;}Without much clue to untangle this mess, I thought it would be easier to get the game running and attach a debugger to it to actually see how it works. Luckily there’s Yuzu, a Nintendo Switch emulator that comes with GDB stub that can allow us to attach a GDB session to it.
To enable GDB on Yuzu, go to Emulation -> Configure…. In the popup, go to General -> Debug -> Debug, and check Enable GDB Stub. To the right end of the check box is the port number where Yuzu is listening for GDB connections.
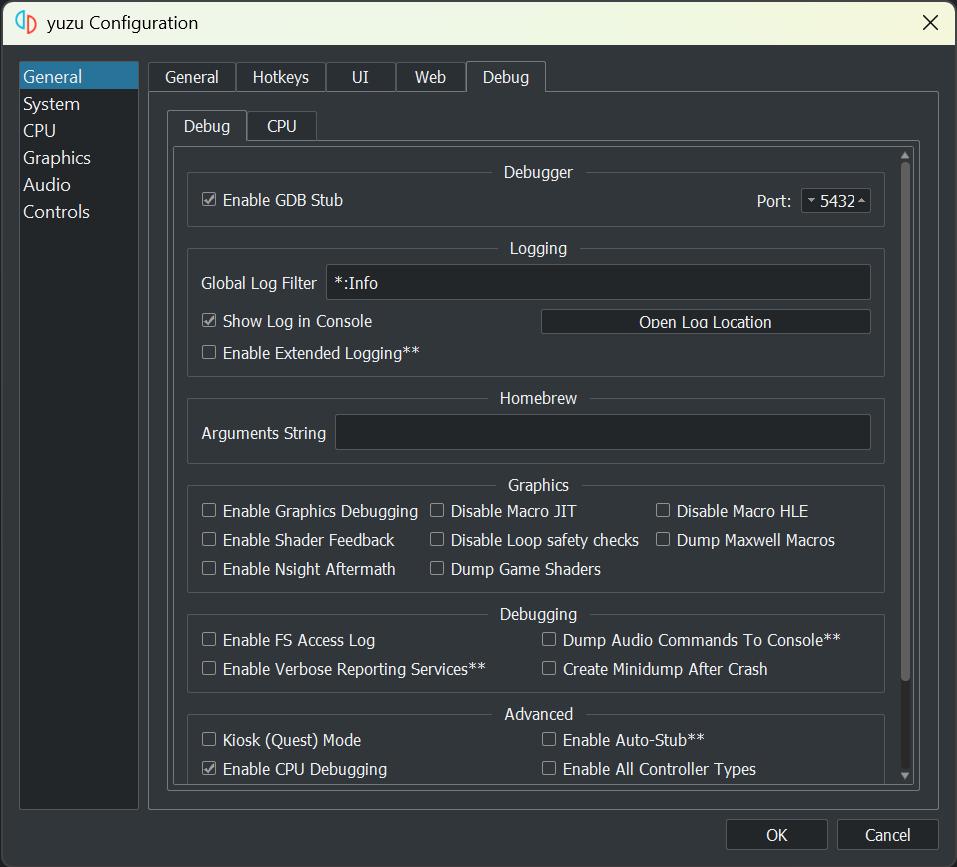
Once GDB Stub is enabled, the game will only initialize the essential parts, and pause to wait for us to inspect it, and set up breakpoints before we ask it to continue.
While Yuzu conveniently provides a way for us to plug GDB into the emulator, not all GDB would work with it. As NSO binaries are essentially AArch64 binaries, we need a GDB that’s compiled to support this architecture to work with it. Fortunately, devKitPro has offered a GDB that’s compatible with AArch64. Once devKitPro is installed, run the following command to install GDB for AArch64:
$ dkp-pacman -Syu devkitA64-gdbWith this, we are ready start debugging with GDB and Ghidra on Yuzu. In the Ghidra project window, click the 🪲 icon in the toolbar to open the Ghidra debugger.
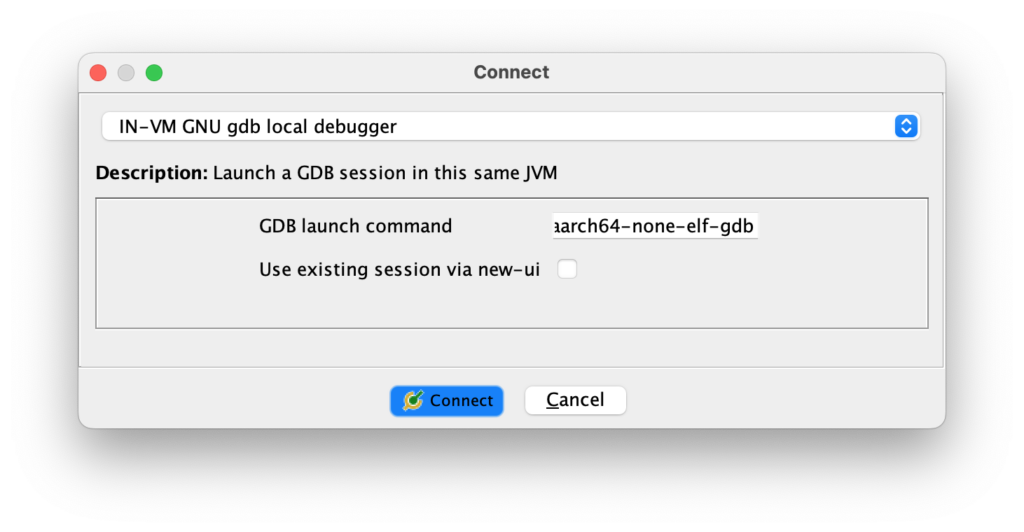
In the debugger window, look for the Debugger Targets panel to the left, and click the Create a new connection to an (sic.) debugging agent. In the dialog, select IN-VM GNU gdb local debugger, and enter the full absolute path of the previously installed gdb for AArch64 in the GDB launch command field.
Once finished, there will be a new Interpreter panel shown up to the right, with a (gdb) prompt at the bottom of the panel. To connect the GDB session to Yuzu, use the following command:
(gdb) target extended-remote 127.0.0.1:5678…where 5678 is the port number previously set in Yuzu settings.
If the connection is successful, you can try to inspect the offset of the running game by running monitor get info. You should get an output similar to this:
(gdb) monitor get infoProcess: 0x51 (main)Program Id: 0x01006b900f436000Layout: Alias: 0x108c600000 - 0x208c600000 Heap: 0x208c600000 - 0x220c600000 Aslr: 0x0008000000 - 0x8000000000 Stack: 0x100c600000 - 0x108c600000Modules: 0x0008000000 - 0x0008003fff rtld 0x0008004000 - 0x000b091fff main 0x000b092000 - 0x000b7a5fff subsdk0 0x000b7a6000 - 0x000c4a2fff sdkIn the output, we can see a line that says 0x0008004000 - 0x000b091fff main. This tells you the address range of our binary is mapped in the RAM. In this case, the starting address in the binary 0x710000000 is corresponding to 0x0008004000
To let Ghidra to match the RAM data against our disassembled binary, we can first drag the main_unc item from the Ghidra project window to the debugger, which allows us to see the RAM view and the decompiled listing side by side.
Then, in the Module tab of the right sidebar of the debugger, click the 📄 icon to open the Static Mapping dialog. In the dialog, press the button to create a mapping. In the Add Static Mapping dialog, fill the following fields accordingly:
- Static range: [
ram: <starting address in listing>, <ending address in listing>] - Dynamic range: [
ram: <starting address of themainmodule>,<ending address of themainmodule>] - Length: (auto filled)
- Lifespan: (-∞ .. +∞)
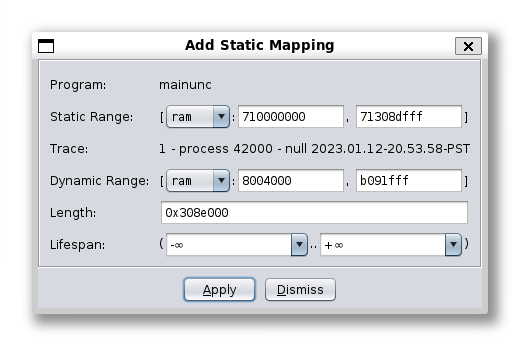
Click Apply to save.
Now, we have the disassembled and annotated binary mapped against the memory space. We can easily navigate like we did in the CodeBrowser. Functions are listed in the Symbol browser at the same place, and we can navigate back to CDictionary$$GetDictionaryData from there.
To set a breakpoint, select the instruction from the Dynamic, Listing, or Decompile panel, and press K.
Once all necessary breakpoints are set, we can move back to the Interpreter window, and type continue to resume the game.
While debugging, some important tools and informations can be found in different panels of the debugger window:
- Step into, Step over, Continue are available in the Object panel to the left.
- Call stack is available at the Stack panel at bottom left.
- Register values are available at the Registers panel to the right. Right click a register can also jump to the Dynamic view to the memory address.
All GDB commands are still available from the Interpreter panel.
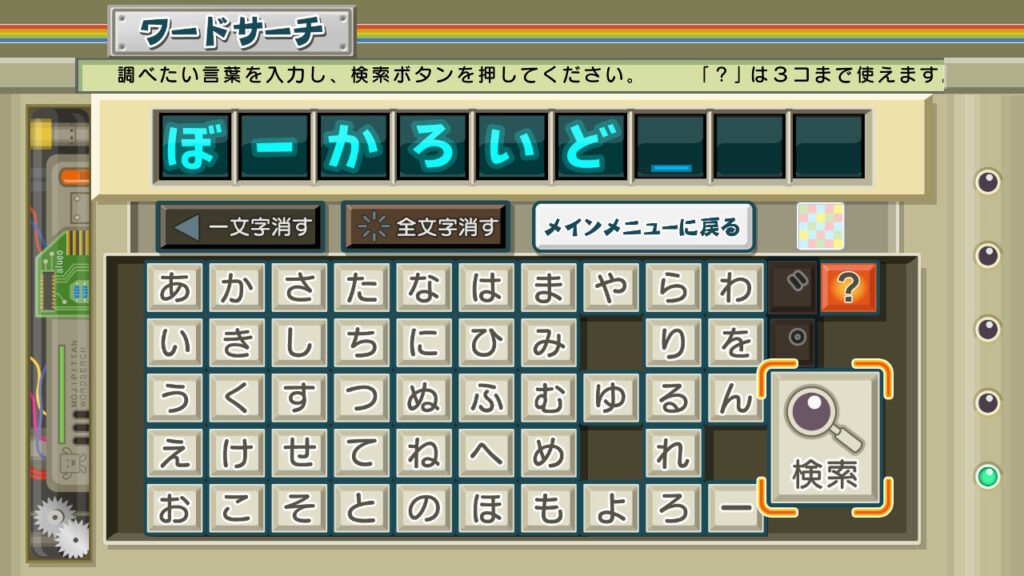
To trigger the game to load up from the dictionary with predictable result, the easiest way is to search for a word in the game’s word lookup feature. Once we hit submit, the game is paused for us at the beginning of the GetDictionaryData method as the first breakpoint hit.
With help of these tools and the memory value at each step, it is much easier to understand the logic of the code, and to untangle those sections that the decompiler did not handle properly.
By inspecting the memory content around the matrix offset, It turns out that that part of the code is actually loading from a list of strings that converts the key into a Hiragana, which happened to follow the Unicode order with a few exceptions.
From there, I was able to fully decode the dictionary files and extract all words with their definitions, which wraps up the project with a success.
I have released the parsing script, and the parsed dictionary data as JSON file to a GitHub repository. There are a lot of binary processing due to the nature of the format, but is in general much more readable. Note that thre are still other data not used in the dictionary files, but since we are only interested in the words and definitions, I think I have achieved the goal.
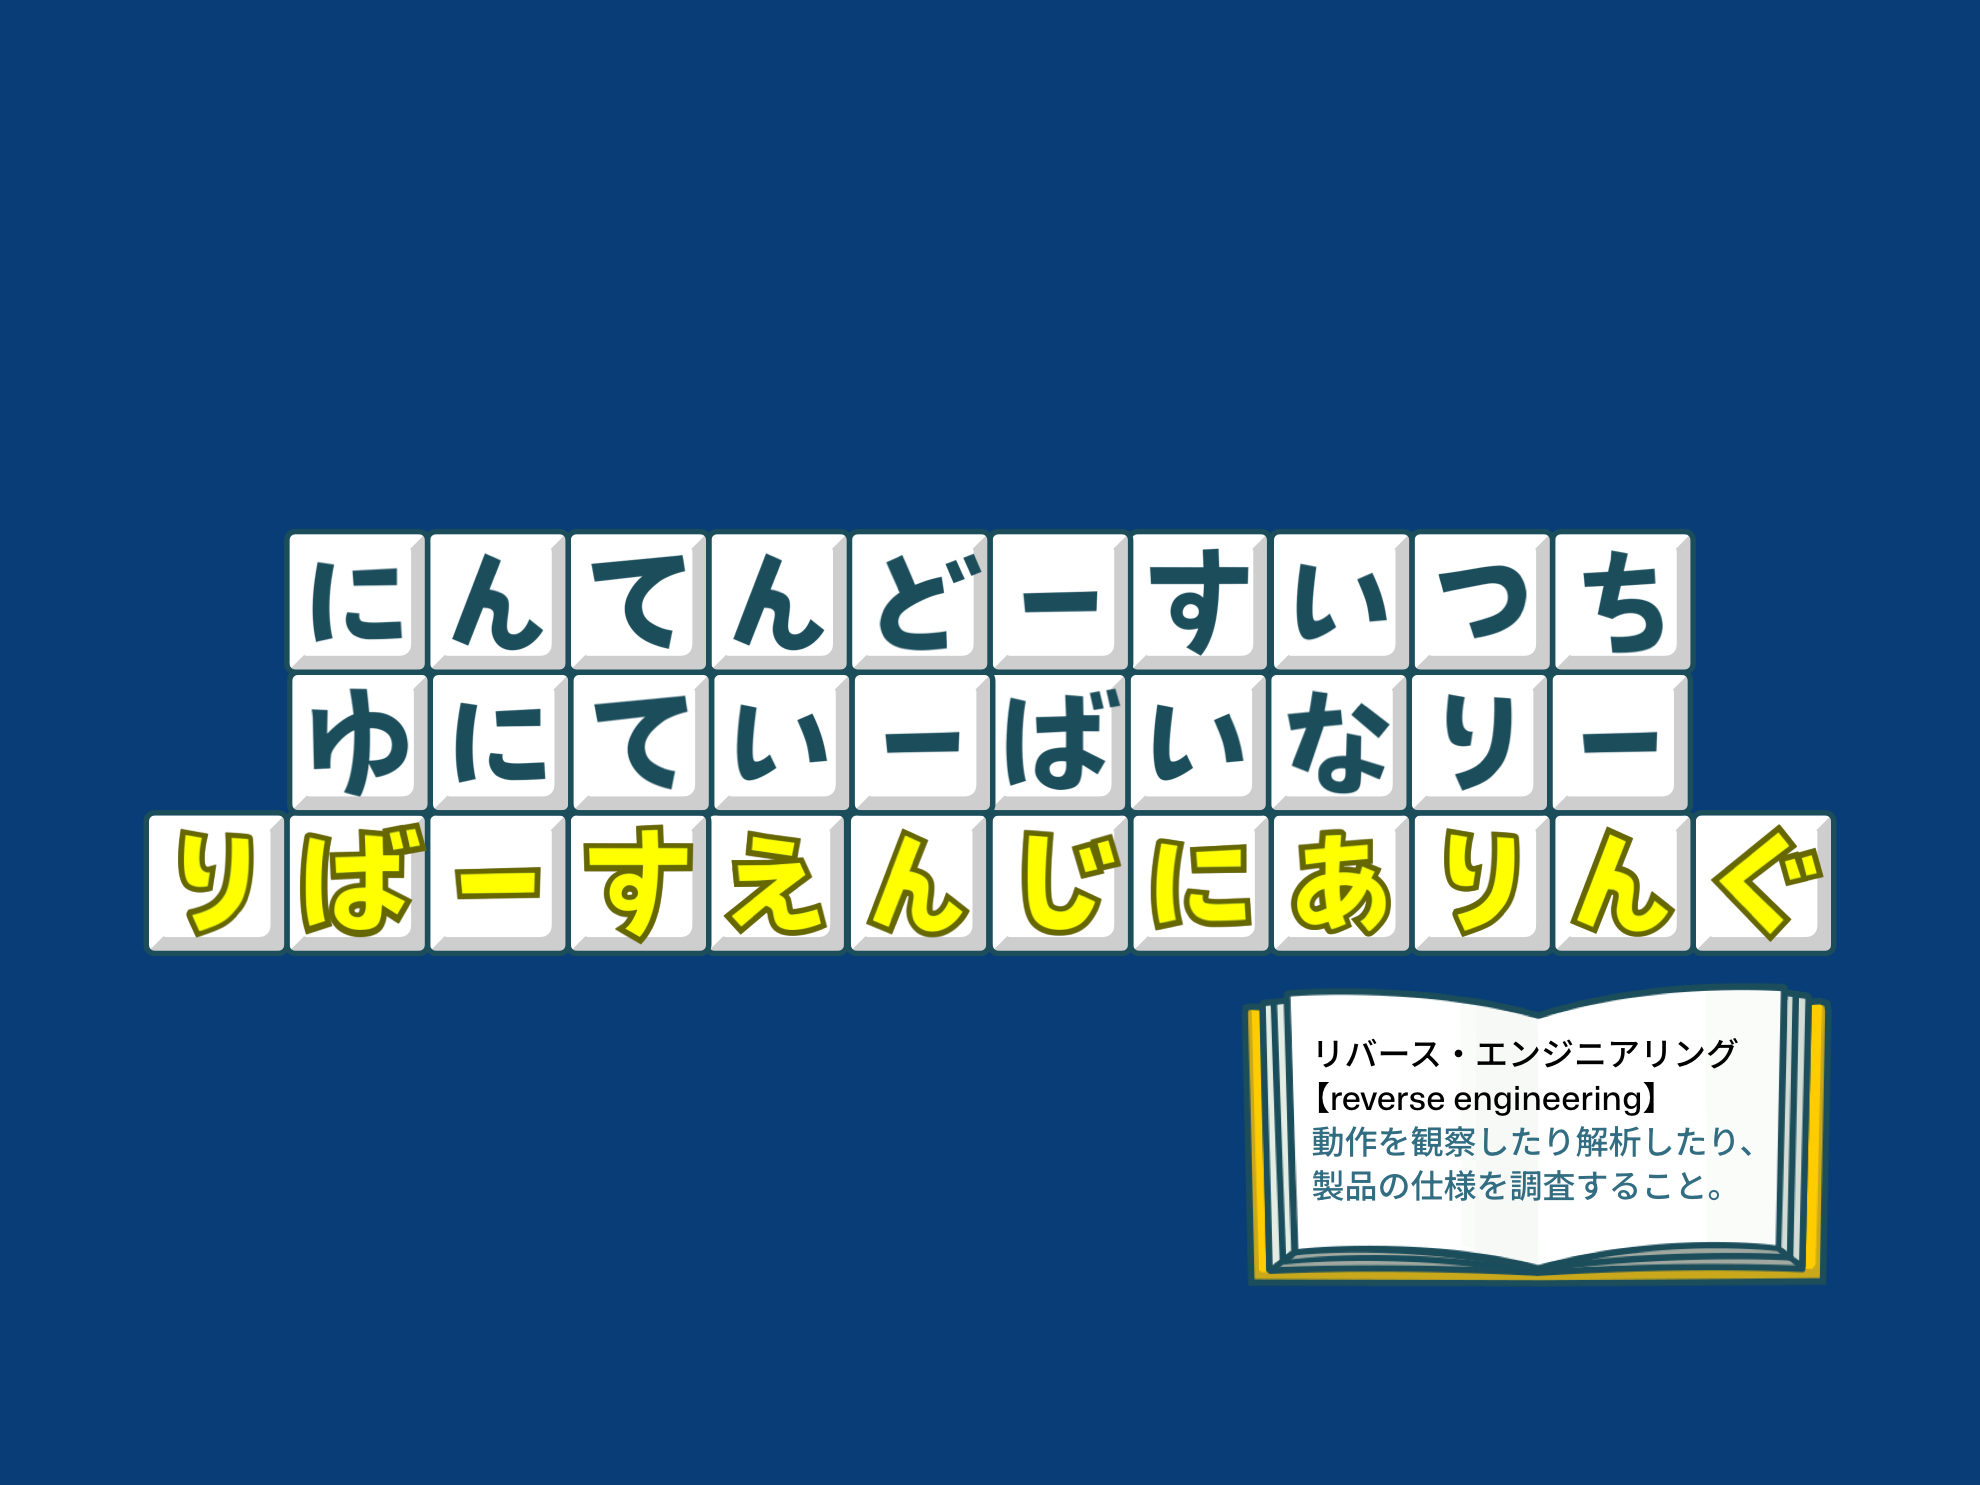
Trivia As it is obvious from the game’s word lookup feature, the longest word in the dictionary has 9 kana, which means リバース・エンジニアリング (reverse engineering) in the cover picture doesn’t actually exist in the dictionary, although リバース and エンジニアリング do. Also, ユニティー (Unity) isn’t in the dictionary either despite being short enough.
Fun fact In order to save space, Mojipittan Encore uses Shift JIS instead of UTF-8 to store the phrases and definitions, as most characters used take 2 bytes in Shift JIS against 3 in UTF-8. However, this has a problem where some accented letters, like the é in café and cliché, are not encoded in Shift JIS. How the game solves it is to encode these characters as question marks in the dictionary, and hardcoded all the affected words in the game logic when converting them back to UTF-8.
Leave a Reply